A dungeon is a place you enter via the map. It often has several rooms and you will encounter monsters. These places also shelter tresure chests and material farming spots (blues sparkles on ground).
Mysterious Ruin[]
This ruin, north of Dandong, is said to be standing here even before the foundation of Dandong. It has mysteriously opened from the day Frain appeared in that world. Inside, you will find two interfaces which allow you to buy (with real money) and use Machine Knight Points (MKP), the game special currency. There are also portals that can be activate thanks to special passes sold by the interfaces.
Quest Involved: [#17: Research the Mysterious Ruin][]
To receive this quest, talk to the lab worker, Riddy inside Dandong Castle.
Upon activating quest 17, a new path that leads to a portal can be found at the back of the Ruin. That specfic portal requires Pass S01 to be activated, and this would then transport the player to a new secret room, at the end of which there is a new portal requiring Pass S02 and so on until the fourth and last room.
Rewards for Completing the Quest:[]
- 2,000G
- Aurora Cape
- 50,000 SP
Transfer Passes: [Required for Completing the Quest][]
Every transfer pass is located in the basement of a particular castle:
- Pass S01: Lecom Castle Basement
- Pass S02: Haltea Castle Basement
- Pass S03: Cureo Castle Basement
- Pass S04: Chasmas Castle Basement
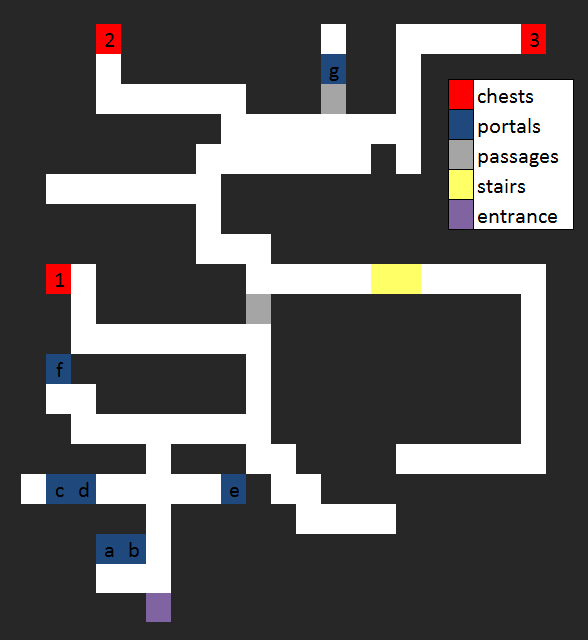
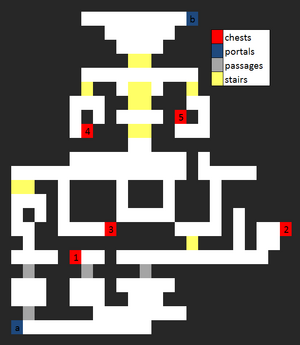
Entrance[]
Portals :
c, d : portals to Forest of Elenoir and Cave of Sea Roar
e : portal to the end of the fourth room (finish quest 17 to activate
f : portal to secret room. Requires Transfert Pass CR
g : portal to secret room 1. Requires Transfert Pass 01
Tresures :
1.
2.
3.
Left Interface items list (a):
Right Interface items list (b):
| Name | Price (MKP) | Effect |
|---|---|---|
| Shine of Sun | 10 | Heal one target completely |
| Glitter of Moon | 25 | One target recovers all MP |
| Drop of Spirit | 35 | Heal one target HP and MP completely |
| Tears of Spirit | 50 | Heal one target HP and MP completely (fight only) |
| Soulpebble of Fire | 125 | Add fire damage/resistance |
| Soulpebble of Water | 125 | Add water damage/resistance |
| Soulpebble of Wind | 125 | Add wind damage/resistance |
| Soulpebble of Earth | 125 | Add earth damage/resistance |
| Soulpebble of Light | 250 | Add light damage/resistance |
| Soulpebble of Darkness | 250 | Add darkness damage/resistance |
| Space-time Pass "Forest" | 750 | Transfert pass for the Forest of Elenoir |
| Space-time Pass "Cave" | 750 | Transfert pass for the Cave of Sea Roar |
| Coke-bottle Glasses | 500 | Accessory EXP+100% |
| Kitty Gloves | 500 | Accessory GOLD+100% |
| Special Earring | 500 | Accessory SP+100% |
| Fruit of Life | 25 | Max HP + |
| Seed of Magical Power | 25 | Max MP + |
| Sutole Herb | 15 | Muscle power + |
| Tamina Medecine | 15 | Physical power + |
| Root of Azi | 15 | Speed + |
| Drop of Mazie | 15 | Magical power + |
| Juice of Demazi | 15 | Magic resistance + |
| Glowing Adventure Tale | 15 | Bravery + |
| Scritpure of Spirit God | 15 | Faith + |
| Sweet Perfume | 15 | Allure + |
| Seed of Beginners | 300 | Initialize Machina Board restoring all SP |
| Wiseman's Handbook | 50 | Gives 50000 SP |
Secret Room 1[]
Monsters : Aglo, Cocaito, Liquid, Tenoe
Drops: Feather of Monster Bird, Raw Silk, White Cloth, Crystal of Magical Power, Small Dragon's Body Fluid
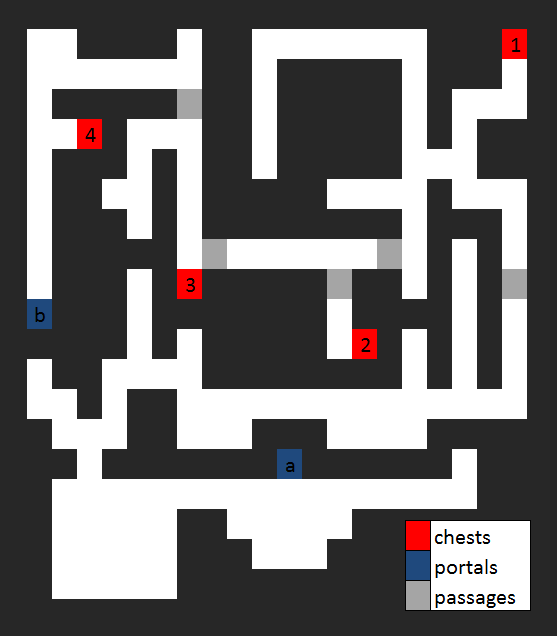
Portals :
a : portal to the entrance
b : portal to secret room 2. Requires Transfert Pass 02
Tresures:
1. Drop of Mazie
2. Virtue Pill
3. Cloak of Late-Night
4. Root of Azi
Secret Room 2[]
Monsters : Faihoe, Failant, Vita, Zelian
Drops : Piece of Fire, Crystal of Magical Power, Sharp Fang, Black Wing
Portals :
a : portal to secret room 1
b : portal to secret room 3. Requires Transfert Pass 03
Tresures :
1. Shine of Sun
2. Tamina Medicine
3. Ankh of Swift Wind
4. Fruit of Life
Secret Room 3[]
Monsters : Desant, Kaiteth, Noid, Wolahoe
Drops : Sharp Fang, Cocaito's Cocoon, Fruit of Life, Soul of Giant, Silver Ingot, Piece of Water

Portals :
a : portal to secret room 2
b : portal to secret room 4. Requires Transfert Pass 04
Tresures :
1. Sheep's Wool
2. Drop of Spirit
3. Gold-rimmed glasses
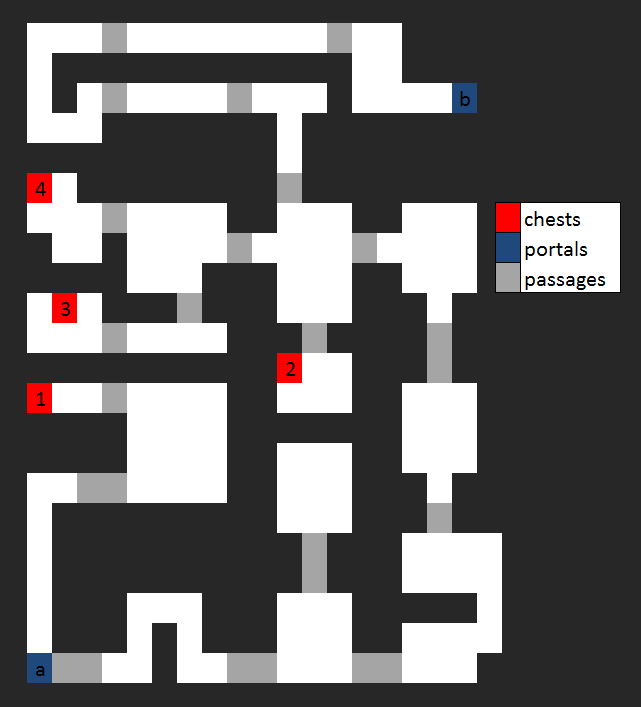
Secret Room 4[]
Monsters : Bioless, De La Croix, Litehoe, Nepenteth, Prio
Drops : Sharp Fang, Claw of Dragon, Piece of Light, Iron Steel Line, Crystal of Magical Power

Portals :
a : portal to secret room 3
b : portal to entrance
Tresures :
1.Tears of Spirit
2.Juice of Demazi
3.Seed of Magical Power
4.Tail of Lizard
5. Claws of Mole
Small Cave[]
East of Dandong.
To finish the first Dandong guard request, talk to the guard in the entrance and you'll get the Machina Board. There is an hidden part on the second room. It can be revealed by hiting the switch at the end of the 3rd room.
Monsters : Fire Ant, Pancho, Vivi, Tenoe (2F, 3F)
Drops : Sharp Fang, Tanned Leather, Black Wing, Small Dragon's Body Fluid
Tresures :
Soon
Farming spots :
- 1F north: Stout Branch
- 1F southwest : Clear Water, Holy Drop
- 1F southeast : Refined Steel
- 2F middle : Stout Branch, Dirty Fur, Actuate Tip of Sword
- 2F hidden part, north : Refined Steel
Forest of Framp[]
Pathway between Dandong area and Lecom area. The first time you walk in, you'll find the road blocked at midway.
Monsters : Cocaito, Fire Ant, Liquid, Pancho, Tenoe, Vivi, Thabit (center part, Lecom road)
Drops : Raw Silk, White Cloth, Sharp Fang, Crystal of Magical Power, Tanned Leather, Small Dragon's Body Fluid, Black Wing, Screw
Farming spots :
- Dandong Road, east : Clear Water
- Dandong Road, northeast after stairs : Black Wing, Actuate Tip of Sword
- Dandong Road, south, west of entrance : Stout Branch
- Forest of Framp 1, southwest : Dirty Fur
Tresures :
- Dandong Road, southeast (from blue sparkles head east then south through trees) : Soulpebble of Earth
- Forest of Framp 1, center :
- Forest of Framp 1, northwest after stairs :
- Forest of Framp 2, southeast :
- Forest of Framp 2,southeast after stairs :
- Lecom Road, southwest :
Spooky Hole[]
Pathway between Haltea Castle and Totori area. Don't forget to go into rooms not on the main way ; there are tresures inside ! You'll find one east of the first room through wall (F1bis), east of the first room after stairs (F1ter), east of third room after bridge (F4).
Monsters : Anpancho, Kaiteth, Landhoe, Nepente, Tenoue, Thabitor, Vita, Wolahoe (rare)
Drops : Tanned Leather, Sweet Perfume, Cocaito's Cocoon, Fruit of Life, Piece of Earth, Crystal of Magical Power, Rugged Vine, Small Dragon's Body Fluid, Generator, Black Wing, Piece of Water
Farming spots :
- F1bis, south : Totori Steel, Silver Ingot
- F1bis, northeast : Silver Ingot, Actuate Tip of Sword
- F1, center after stairs : Silver Ingot
- F3 southwest : Black Wing
- F3 east : Actuate Tip of Sword, Rotten Seed
- F4 southwest : Refined Steel
- F4 west (2 spots): Totori Steel
- F5 (boss room) : Stout Branch, Round Shell, Actuate Tip of Sword
Tresures :
- F1bis, east : Drop of Mazie
- F1bis, northwest : Soulpebble of Earth
- F1, center after stairs :
- F1ter :
- F2 west :
- F3 west :
- F4 east, middle of swamp :
- F4 northeast :
- F4 west, middle of swamp :
Cave of Surf Sound[]
East of Totori.
When first entering the 3rd room, you'll find out it's full of water. The level can be lowered thanks to two switches hidden in two rooms north to that room.
Monsters : Nepente, Noid, Ryuposs, Sea Bat, Thabit, Thabitor, Wolahoe, Anpancho (F3, F4, F5, F6), Desant (F3, F4, F5, F6), Kaiteth (F3, F4, F5, F6), Oryuposs (F3, F4, F5, F6)
Drops : Rugged Vine, Soul of Giant, Silver Ingot, Steel White Thread, Sharp Fang, Root of Azi, Screw, Generator, Piece of Water, Seed of Magical Power, Tanned Leather, Sweet Perfume, Cocaito's Cocoon, Fruit of Life
Farming spots :
- F1 northwest : Totori Steel
- F2 middle west : Totori Steel
- F4 (area north of 3rd area, by switch) northwest : Round Shell, Hard Scale
- F3 southeast, above remaining water, access down stairs on east wall : Dirty Fur, Hard Scale
- F3 extreme south : Totori Steel
- F6 north : Totori Steel
Tresures :
- F1 northeast up :
- F1 northeast down :
- F2 northeast :
- F3 southwest :
- F3 south :
- F5 northwest :
- F5 east :
- F6 entrance :
Fountain of Spirit[]
Boat needed. On artic island north of Haltea.
To find your way inside the forest, simply follow the bunches of pink flowers. If you follow another way you'll be teleported back to the beginning of the forest maze. At the end of the labyrinth there is the spirit fountain. In the trees south of the fountain is hidden a lanpancho. To fight him, simply go to speak with him and answer "Bully". Remember that killing a lanpancho is the goal of guard station request 21.
Monsters : Bjorn, Desant, Gramaan, Prio, Winhoe
Drops : Sharp Fang, Heart of Leo, Drop of Mazie, Crystal of Magical Power, Piece of Wind, Seed of Magical Power, Root of Azi
Farming spots :
- 2nd area west : Stout Branch, Right Arm of Big Tree
- 1st area north (access after talking to the Earth God) : Holy Drop
Tresures :
- 2nd area southwest, up stairs :
- 2nd area center east :
- 2nd area northwest :
- Forest of Ambivalence, 2nd area :
- Spirit Fountain, west side :
- Spirit Fountain, east side :
Holy Mountain, El Aldo[]
Boat needed. Pathway between Cureo area and Chasmus area.
The path within the mountain is long and full of powerful monsters. Be sure you are ready before going in. At midway there is a little cabin where you can rest before beginning the descent, which has even more powerful monsters.
Monsters : Agoole, Bioless (not F1), Braihoe (not F1), Chronoid (grottos), Gramaan, Horned, Litehoe, Nepenteth (not F1), Thabit, Thabitor (F3, F4, F5), Thabitest, Lanpancho (extra rare, F1), De La Croix (F4, F5)
Drops : Feather of Monster Bird, Sharp Fang, Piece of Darkness, Heart of Leo, Tamina Medecine, Robust Horn, Glowing Adventure Tale, Piece of Light, Iron Steel Line, Screw, Generator, Genuine Liquefied Oil, Tanned Leather, Claw of Dragon, Tamina Medecine
Farming spots :
- F1 north of entrance (a) : Stout Branch, Right Arm of Big Tree
- F2 west (a) : El Aldo Steel
- F2 northwest (b) : Totori Steel
- F3 south (a) : El Aldo Steel
- F3, middle grotto (3) : Clear Water, Holy Drop
- F3 go through right grotto, then right grotto (5) : El Aldo Steel
- F3 go through right grotto, then middle grotto (6) : El Aldo Steel
- F3 go through right grotto, then left grotto (7) : Rotten Seed, Round Shell
- F3 behind cliff (through left grotto), northwest grotto (8) : Rotten Seed, Black Wing
- F4 after cabin, east (b) : El Aldo Steel
- F4 west, take western stairs then western stairs (a) : Refined Steel
- F5 go east then pass under stone arch then go southwest (a) : El Aldo Steel
- F5 southeast (b) : Hard Scale, Right Arm of Big Tree
Tresures :
- F1 north of entrance (a) :
- F1, 2nd cliff north of entrance (b) :
- F1, center of map, east of 1st cliff (c) :
- F1 southeast (d) :
- F2 east, upstairs (a) :
- F2 northwest (b) : Soulpebble of Earth
- F3 left grotto, east (1) :
- F3 behind cliff, east (a) :
- F4 after cabin, take west stairs then west stairs then west stairs (a) :
- F5 northwest (a) :
- F5 go east then pass under stone arch then go southwest (b) :
- F5 west, downstairs (c) :
- F5 southwest (d) :
- F5 southeast (e) :
Map :

Cave of Darkness[]
Airship needed. On island west of Keyan.
Not to get lost inside the cave, remember Bell's words and always walk straight.
Monsters : Katanoue (1F), Laflesia, Thabitest (1F), Yeager, Water Elemental, Wind Elemental, Fire Elemental, Earth Elemental, Goldonoid (not in 1st room), Agloia (after bridge)
In the area under the bridge, there are only Elementals.
Drops : Hard Scale, Iron Steel Line, Scripture of Spirit Gods, Genuine Liquefied Oil, Fiery Fire Bag, Piece of Water, Piece of Wind, Piece of Fire, Piece of Earth, Seed of Magical Power, Soul of Giant, Feather of Monster Bird
Farming spots, Piece of Darkness : F1 southwest, F1 west, F2 south, F4 west
Tresures :
- F1, northwest :
- F2, east :
- F2, center :
- F2, from south after stairs, head north :
- F3 (after bridge) :
Airship[]
Airship needed. Far east of Col over the Sea.
To enter it, you simply need to fly into it. On the fourth floor, after a laser, you'll meet a door. Inside is a machine that will restore your health.
Monsters : Agoole (1F), Agloia (not 1F), Bison (not 1F), Black Pancho (not 1F), Ende, Goldonoid (not 1F), Horned (1F), Katanoue, Laflesia (not 1F), Nepenteth (1F), Proof, Thabit, Thabitor, Vanoid, Yeager, Earth Elemental (4F), Fire Elemental (5F), Water Elemental (5F)
Drops : Feather of Monster Bird, Robust Horn, Tanned Leather, Claw of Dragon, Soul of Giant, Hard Scale, Iron Steel Line, Scripture of Spirit Gods, Crystal of Magical Power, Screw, Genuine Liquefied Oil, Fiery Fire Bag, Piece of Earth, Piece of Fire, Piece of Water
Tresures :
1F, left door on south corridor (1) : Ruby Earring
1F, middle door on south corridor (2) : Cross of Resurrection
1F, right door on south corridor (3) : Diamond Earring
1F, left door on north corridor (4) : Shield of Four Gods
1F, right door on north corridor (5) : Cross of Blessing
2F, door on south corridor (1), left : Tears of Spirit
2F, door on south corridor (1), right : Seed of Magical Power
2F, left door on north corridor (2), left : Gold-rimmed Glasses
2F, left door on north corridor (2), right : Soulpebble of Earth
2F, middle door on north corridor (3), left : Second Pass
2F, middle door on north corridor (3), right : Soulpebble of Water
2F, left door on north corridor (4), up : Soulpebble of Wind
2F, left door on north corridor (4), down : Tears of Spirit
2F east, door on corridor (5), left : Tears of Spirit
2F east, door on corridor (5), right : Soulpebble of Fire
4F, left door on north corridor (1) : Juice of Demazi
4F, right door on north corridor, hidden behind box (2) : Scripture of Spirit Gods
4F middle west : Soulpebble of Earth
3F underneath passage, south : Drop of Mazie
3F underneath passage, north : First pass
5F, 1st on left : Soulpebble of Light
5F, 2nd on left : 12000G
5F, 2nd on right : Soulpebble of Fire
5F, 1st on right : Soulpebble of Earth
4F door after laser (3) : Tears of Spirit
Wreckage of Airship[]
After a certain point in the story, the airship will crash on the small island under it. The former rooms are still accessible, but the crash generates a hole into the first room corridor which leads to the bottom of it.